Salesforce

Import of an AFX connector does not show the display name of the connector in RSA Identity Governance & Lifecycle

Header
Import of an AFX connector does not show the display name of the connector in RSA Identity Governance & Lifecycle
Import-of-an-AFX-connector-does-not-show-the-display-name-of-the-connector-in-RSA-Identity-Governance-Lifecycle
Import of an AFX connector does not show the display name of the connector in RSA Identity Governance & Lifecycle
Work in Progress
1,550.67
Article Content
 
RSA Product Set: RSA Identity Governance & Lifecycle
RSA Version/Condition: 7.1.1, 7.2.0
 
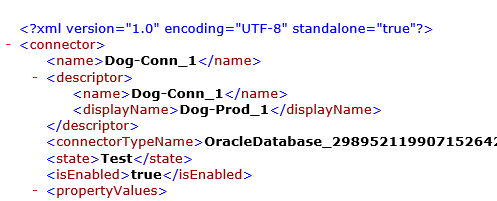
When importing an AFX connector, the import shows a connector name that you do not recognize. You were expecting to see a different connector name.

In the following example, an AFX connector named Dog-Prod_1 is exported. When the connector package is imported into another system, the only name available for import is Dog-Conn_1.
 
  1. The below AFX connector named Dog-Prod_1 is exported.
User-added image


  1. When importing the Dog-Prod_1 AFX connector, the import says Dog-Conn_1. There is no other column name that can be displayed under Table Options > Columns tab.
User-added image
 
  1. A review of the XML file that contains the connector definition, shows the <name> of the connector as Dog-Conn_1 and the <displayName> as Dog-Prod_1.

User-added image


The name of the AFX connector has been changed (AFX > Connectors > {connector name} > Edit).

If you edit an AFX connector and change the name, it is actually only the display name that gets changed. The original name cannot be changed because it is the unique identifier for the connector. The problem is that when you import the connector, it shows the unique name rather than the display name. In the example, the AFX connector name has been changed from Dog_Conn_1 to Dog-Prod_1.

This is a known issue reported in engineering ticket ACM-103127.
 
This issue is being investigated by the Engineering team in order to provide a permanent resolution in a future release.
 
Determine the name of the connector to be imported by looking in the XML file that contains the connector definition.

For example,
  1. In Windows extract the connector package. This will create a directory with the same name as the package.
  2. Go the connector package directory just created.
  3. Go to acmExportConnector connector CONNECTOR.  
  4. Edit Connector.xml.
User-added image
  1. Under the <connector> section note the <name> and <displayName> of the connector. 
  2. <displayName> is the name as you know it listed under AFX > Connectors. In this example: Dog-Prod_1.
  3. <name> is the name of the connector as shown during the connector import. In this example: Dog-Conn_1.
  4.  Import the connector again using the <name> of the connector: Dog-Conn_1.
000038399
Article Settings
External
Case
Diane McCoy
1/31/2020 9:39 PM
Diane McCoy
Article Assignment


Article Properties
Published
Knowledge
000043732
Diane McCoy
Admin9 Integration (AWS)
English

Powered by