Troubleshooting RSA Authentication Manager 8.1 native SecurID and RADIUS authentication issues
Originally Published: 2014-10-23
Article Number
Applies To
RSA Product/Service Type: Authentication Manager
RSA Version/Condition: 8.1 P05
Issue
Native SecurID authentication issue(s)
The activity keys below are seen individually in the real-time authentication activity monitor and relate to missing data in the configuration or the instances for the mismatch of a node secret.| Activity Key | Description | Reason | Steps to Resolve |
| Lookup Authentication agent | Lookup authentication agent by IP address "n.n.n.n" | Authentication agent not found | Add an agent host with the IP address n.n.n.n. See Item 1 in Tasks. |
| Node secret verification | Verifying node secret for the agent "agent_hostname" with IP address "n.n.n.n" in security domain "SecurityDomain" | Node secret mismatch: cleared on server but not on agent | Reset the node secret. See Item 2 in Tasks. |
| Node secret verification | Verifying node secret for the agent "agent_hostname" with IP address "n.n.n.n" in security domain "SecurityDomain" | Node secret mismatch: cleared on agent but not on server | Reset the node secret. See Item 3 in Tasks. |
| Node secret verification | Verifying node secret for the agent "agent_hostname" with IP address "n.n.n.n" in security domain "SecurityDomain" | Node secret mismatch: agent and server using different node secrets | Reset the node secret. See Item 4 in Tasks. |
RADIUS authentication issue(s)
The activity key below is seen individually in the real-time authentication activity monitor and relate to missing/incorrect data in the configuration.
| Activity Key | Description | Reason | Steps to Resolve |
| Authentication log request | Log request received from agent "agent_hostname" with IP address "n.n.n.n" in security domain "SecurityDomain" | Syntax error | Reset the RADIUS shared secret. See Item 5 in Tasks. |
Tasks
- When the message Authentication agent not found is seen in the authentication activity monitor, an administrator will need to create an RSA agent in the Security Console to resolve the issue. Refer to Chapter 3 (Deploying Authentication Agents) in the RSA Authentication Manager 8.1 Administrator's Guide for information on creating an agent.
- Reset the node secret by clearing the node secret on the actual authentication agent (or third-party device) and clearing the node secret from the RSA agent record in the Authentication Manager primary instance.
- Cleared on server but not on agent.
- For an RSA Authentication Agent for Windows, an administrator would launch the RSA Control Center and select Advanced Tools then click the Clear Node Secret button. This will delete the file named securid from C:\Program Files\Common Files\RSA Shared\Auth Data in newer authentication agents, or from C:\Windows\system32 on older agents.
- RSA Authentication Agents for PAM/UNIX store the node secret file named securid in /var/ace. SSH to the agent and delete or rename rhe file.
- Cleared on server but not on agent.
- Cleared on agent but not on server.
To resolve this message,
- From the primary instance's Security Console, navigate to Access > Authentication Agents > Manage Existing.
- Click on the agent in question and select Manage Node Secret.
- Check the box labeled Clear the node secret.
- Click Save.
Chapter 3 (Deploying Authentication Agents) in the RSA Authentication Manager 8.1 Administrator's Guide provides information on managing the node secret.
- For the error that the agent and server are using different node secrets, review the article on how to recreate the node secret for RADIUS server in Authentication Manager 8.x.
- The syntax error message occurs possibly when the RADIUS shared secret key stored on the RADIUS client does not match the secret stored on the Authentication Manager (RSA RADIUS) server for that RADIUS client. To resolve the error, reset the RADIUS shared secret and perform an authentication test to confirm. To resolve this message,
- On the RADIUS client, follow manufacturer's instructions on how to set a RADIUS shared secret.
- From the primary instance's Security Console, navigate to RADIUS > RADIUS Clients > Manage Existing.
- Click on the RADIUS client in question and select Edit.
- In the Shared Secret box, enter the same string entered in step 1.
- Click Save.
Refer to Chapter 13 (Administering RSA RADIUS) found in the RSA Authentication Manager 8.1 Administrator's Guide for information on the RSA RADIUS authentication process.
Resolution
NOTE: Use of port 5500 TCP for authentication is new in RSA Authentication Manager 8.1
When native SecurID is used to send the authentication request to an RSA Authentication Manager 8.1 instance, an RSA agent record needs to be created in the Security Console. To do this,
- Login to the primary's Security Console.
- Navigate to Access > Authentication Agents > Add New.
- Enter the following information about the agent:
- Hostname. Enter the fully-qualified hostname or hostname of the RSA agent
- IP Address. Enter the agent's IP address on the network
- Protect IP Address. Check this option to prevent auto-registration from unassigning this agent's IP address.
- Alternate IP Addresses. Provide alternate IP addresses for the agent if it has more than one network interface card or is located behind a static NAT firewall.
- Agent Type. Leave as Standard Agent unless it is a web resource and then select Web Agent
- Click Save when done.
When RADIUS is used to send the authentication to an RSA Authentication Manager 8.1 instance a RADIUS client and an associated RSA agent record both need to be created in the Security Console.To do this,
- Login to the primary's Security Console.
- Navigate to RADIUS > RADIUS Clients > Add New.
- Enter the following information about the RADIUS client:
- Client Name. Enter the fully-qualified hostname or hostname of the RADIUS client.
- IP Address. Enter the RADIUS client's IP address on the network.
- Make/Model. Leave as Standard Radius, unless you intend to use vendor RADIUS attributes in RADIUS profiles where you would select a vendor name (enabling access to the vendor's RADIUS dictionary).
- Shared Secret. Used to authenticate communication between a RADIUS client and Authentication Manager (RSA RADIUS) server.
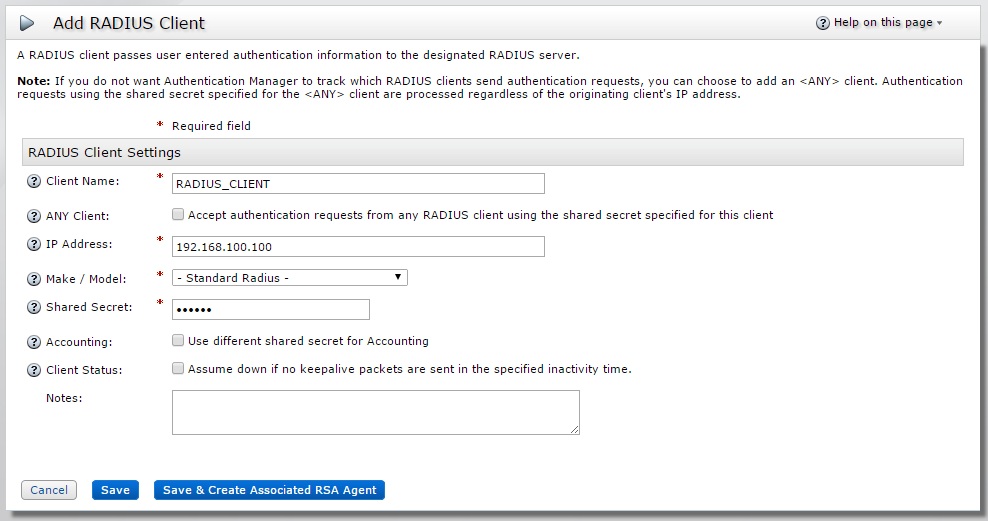
- Click Save & Create Associated RSA Agent when done.
- Leave the default values and click Save.
When performing authentication tests for native SecurID or RADIUS authentications always use the real-time authentication activity monitor, as this will display messages relating to the how the Authentication Manager instance is processing those authentications. To access the real time authentication activity monitor,
- From the Security Console, select Reporting > Real-time Activity Monitors > Authentication Activity Monitor.
- A pop up window will display.
- Click on Start Monitor. As requests come in, they will display in the window.
Notes
- RSA Authentication Manager supports RADIUS shared secrets of up to 127 alphanumeric characters, including spaces and the following special characters:
~!@#$%^&*()_+|\=-'{}[]:"';<>?/.,
- RSA RADIUS writes to a log file located in the /opt/rsa/am/radius. The name of this log file is the date it was written; for example, yyyymmdd.log. If today's date is 24 October 2014 then the log file would be named 20141024.log. A new log file is created every day.
- Changing the RADIUS LogLevel and TraceLevel parameters in the /opt/rsa/am/radius.ini will write more data into the RADIUS log file. Edit the radius.ini file to allow verbose logging in the Operations Console. To do this,
- From the Operations Console, select Deployment Configuration > RADIUS Servers.
- When prompted, enter the name and password for a Super Admin user ID.
- Click on the name of the RADIUS server in the deployment and click Manage Server Files.
- Click on the radius.ini and select Edit.
- Update LogLevel and TraceLevel values to have a new value of 2.
- Click Save & Restart RADIUS Server.
- Repeat steps 1 - 6 on each Authentication Manager server in the deployment to get verbose logging on all servers.
- Since this verbose logging adds so much information to the RADIUS log, follow steps 1 - 6 when you have finished troubleshooting RADIUS authentications. Set the values for LogLevel and TraceLevel from 2 to 0 then click Save & Restart RADIUS Server. Again, rollback the change on all servers.
|
Activity
|
Event in RADIUS log file
|
| Where the RADIUS client and associated agent host are not configured in the Security Console |
09/28/2014 15:32:51 Warning -- Authentication request received from unknown RAS Client n.n.n.n.
|
| After setting up the RADIUS client and associated agent host in the Security Console and using valid credentials |
09/28/2014 15:34:52 Sent accept response for user <userid> to client <RADIUS_client_name>.
|
| RADIUS authentication using CHAP |
09/28/2014 15:40:11 Unable to find user <userid> with matching password
09/28/2014 15:40:11 Sent reject response |
| Mismatching the RADIUS Secret Key (RADIUS shared Secret) |
09/28/2014 15:40:11 Unable to find user <userid> with matching password
09/28/2014 15:40:11 Sent reject response
The message authentication method failed, passcode format error will be seen in the Authentication Activity Monitor |


